# Get started - Cover Pipeline
This topic details how to use Diffblue Cover to write tests for your project as part of a CI pipeline. It outlines the basic commands that you will need to add to your CI scripts, and provides general information to understand the key steps - for specific CI tools, refer to the following:
* [cover-pipeline-for-gitlab](https://cover-docs.diffblue.com/features/cover-pipeline/cover-pipeline-for-gitlab "mention")
* [cover-pipeline-for-github](https://cover-docs.diffblue.com/features/cover-pipeline/cover-pipeline-for-github "mention")
* [quick-start-jenkins](https://cover-docs.diffblue.com/features/cover-pipeline/cover-pipeline-for-ci/quick-start-jenkins "mention")
* [quick-start-guide-azure](https://cover-docs.diffblue.com/features/cover-pipeline/cover-pipeline-for-ci/quick-start-guide-azure "mention")
* [quick-start-guide-aws](https://cover-docs.diffblue.com/features/cover-pipeline/cover-pipeline-for-ci/quick-start-guide-aws "mention")
## Assumptions
This topic assumes that you have:
* A basic understanding of Cover CLI - see [get-started-cover-cli](https://cover-docs.diffblue.com/get-started/get-started/get-started-cover-cli "mention").
* A Maven or Gradle project that:
* Compiles.
* Does not have non-compiling or failing tests.
* Is stored in a Git repository with a CI tool enabled.
* A basic understanding of your chosen CI tool.
* The ability to store secrets variables for your CI tool.
* Diffblue Cover CLI release zip stored in the cloud, along with an appropriate license key.
## Summary
To integrate Diffblue Cover into your CI pipeline, we will guide you through creating a CI script that:
1. [Builds your project.](#1.-building-the-project)
2. [Downloads and activates Diffblue Cover CLI.](#2.-downloading-and-activating-diffblue-cover-cli)
3. [Runs Diffblue Cover to create tests.](#3.-running-diffblue-cover-cli-to-create-tests)
4. [Commits the created tests to a branch.](#4.-committing-the-created-tests-to-a-branch)
## 1. Building the project
To run Diffblue Cover CLI your project must be built. Running the project’s tests is not required, and you will save time by skipping them, but they do need to compile and pass. For example, you can use the following command to build a Maven project while skipping the tests:
```bash
mvn --batch-mode --no-transfer-progress clean install -DskipTests
```
## 2. Downloading and activating Diffblue Cover CLI
You need to give the CI run access to the Diffblue Cover files and activate the `dcover` license in order to write tests.
This step assumes that you have a URL with the Diffblue Cover CLI release zip and the license key for online activation during the CI run. If your license allows it you may wish to install Diffblue Cover with offline activation. See [licensing](https://cover-docs.diffblue.com/get-started/licensing "mention").
You will need to add two secret variables which, here, will be represented as environment variables:
* The first secret variable with the name `DIFFBLUE_COVER_URL` and the value set to the URL of the Diffblue Cover CLI release zip file.
* The second with the name `DIFFBLUE_COVER_LICENSE_KEY` and the value set to your Diffblue Cover license key.
Append the code for getting, unzipping, and activating `dcover`, to your script.
```bash
mkdir -p "~/dcover"
cd "~/dcover"
curl --silent --show-error --location --output "diffblue-cover-cli.zip" "$DIFFBLUE_COVER_URL"
unzip -q "diffblue-cover-cli.zip"
rm -f "diffblue-cover-cli.zip"
PATH=$PATH:~/dcover/
dcover activate "$DIFFBLUE_COVER_LICENSE_KEY"
```
This will put the Diffblue Cover files into the `dcover` directory in the root of the workspace. The files contain a script called `dcover` which has the relative path `dcover/dcover` (or `dcover\dcover.bat` in Windows environments). The script is added to your `PATH` variable so that you can invoke Diffblue Cover CLI as `dcover` (or `dcover.bat`).
Push the changes so that your CI is triggered - ensure that you can see the successful activation of `dcover` in your CI output before moving on. You will see a line starting with "Successfully activated key" if this was successful. If Diffblue Cover did not successfully activate, please see [licensing](https://cover-docs.diffblue.com/get-started/licensing "mention") or contact [Diffblue Support](https://www.diffblue.com/support).
## 3. Running Diffblue Cover CLI to create tests
Now that Diffblue Cover is running in CI, you can use it to write tests. The next two items show how to write tests for a single module, and then how to extend this to all modules.
**Creating tests for a single module:**
Choose a module to test in your project. Append the following to your workflow file, changing `moduleToTest` to a module in your project or, if your project does not have modules, `--working-directory moduleToTest` can be removed or changed to `--working-directory`. Note that the `--batch` option makes the output more suitable for CI, as it ensures the CI logs are not cluttered with progress bar output.
```bash
dcover create --working-directory="moduleToTest" --batch
```
Push the changes so that `dcover` runs in the CI. Once successfully complete, you should expect to see output that looks like this:
```sh
INFO Found 7 callable methods in 2 classes
INFO
INFO Creating tests:
INFO ---------------
...
INFO All 5 created tests were successfully validated.
```
If you don't see this output, the `dcover` command may need a small modification for your project, or dependencies adding, until it works. The output gives you warnings along the way to guide you. See [commands-and-arguments](https://cover-docs.diffblue.com/features/cover-cli/commands-and-arguments "mention") for more information.
Depending on the size of your module/project, creating tests could take a while. You may wish to restrict test creation to a single class by specifying its fully qualified name:
```bash
dcover create com.somepackage.SomeClass --working-directory="moduleToTest" --batch
```
**Creating tests for all modules:**
To write tests for all the modules, you can use a loop as follows:
```bash
for MODULE in module_name_1 module_name_2 module_name_3
do
dcover create --batch --working-directory="$MODULE"
done
```
## 4. Committing the created tests to a branch
To see the new tests created in the previous step in your project, you need to commit them and push back to the repository. Depending on your CI tool you may also need to configure a Git user to create the commit. We recommend creating a service account for this.
```bash
git config user.name db-ci-bot
git config user.email db-ci-bot@yourorg.com
```
To commit the tests, append the following to your script. This will check for any changes to Diffblue tests, add them to a commit and push to your branch.
```bash
if [ -n "$(git status --short **/*DiffblueTest.java)" ]; then
git add **/*DiffblueTest.java
git commit --message "Update Unit Tests for $(git rev-parse --short HEAD)"
git push --set-upstream origin
else
echo "Nothing to commit"
fi
```
**Note:** Be careful not to create an infinite CI loop here. We recommend checking the author of each commit to ensure you're not creating tests for a commit authored by your Diffblue service account.
```bash
LAST_NON_BOT_COMMIT="$(git rev-list -1 --author='^(?!db-ci-bot).*$' --perl-regexp HEAD --no-merges)"
LAST_COMMIT="$(git rev-list HEAD -1 --no-merges)"
if [[ "$LAST_NON_BOT_COMMIT" == "$LAST_COMMIT" ]]
then
...
fi
```
## Next steps
In this topic we've outlined the basic commands that you will need to add to your CI scripts, but we've only provided general information to understand the key steps - for specific CI tools, refer to the following:
* [cover-pipeline-for-gitlab](https://cover-docs.diffblue.com/features/cover-pipeline/cover-pipeline-for-gitlab "mention")
* [cover-pipeline-for-github](https://cover-docs.diffblue.com/features/cover-pipeline/cover-pipeline-for-github "mention")
* [quick-start-jenkins](https://cover-docs.diffblue.com/features/cover-pipeline/cover-pipeline-for-ci/quick-start-jenkins "mention")
* [quick-start-guide-azure](https://cover-docs.diffblue.com/features/cover-pipeline/cover-pipeline-for-ci/quick-start-guide-azure "mention")
* [quick-start-guide-aws](https://cover-docs.diffblue.com/features/cover-pipeline/cover-pipeline-for-ci/quick-start-guide-aws "mention")
## Diffblue Cover - one AI
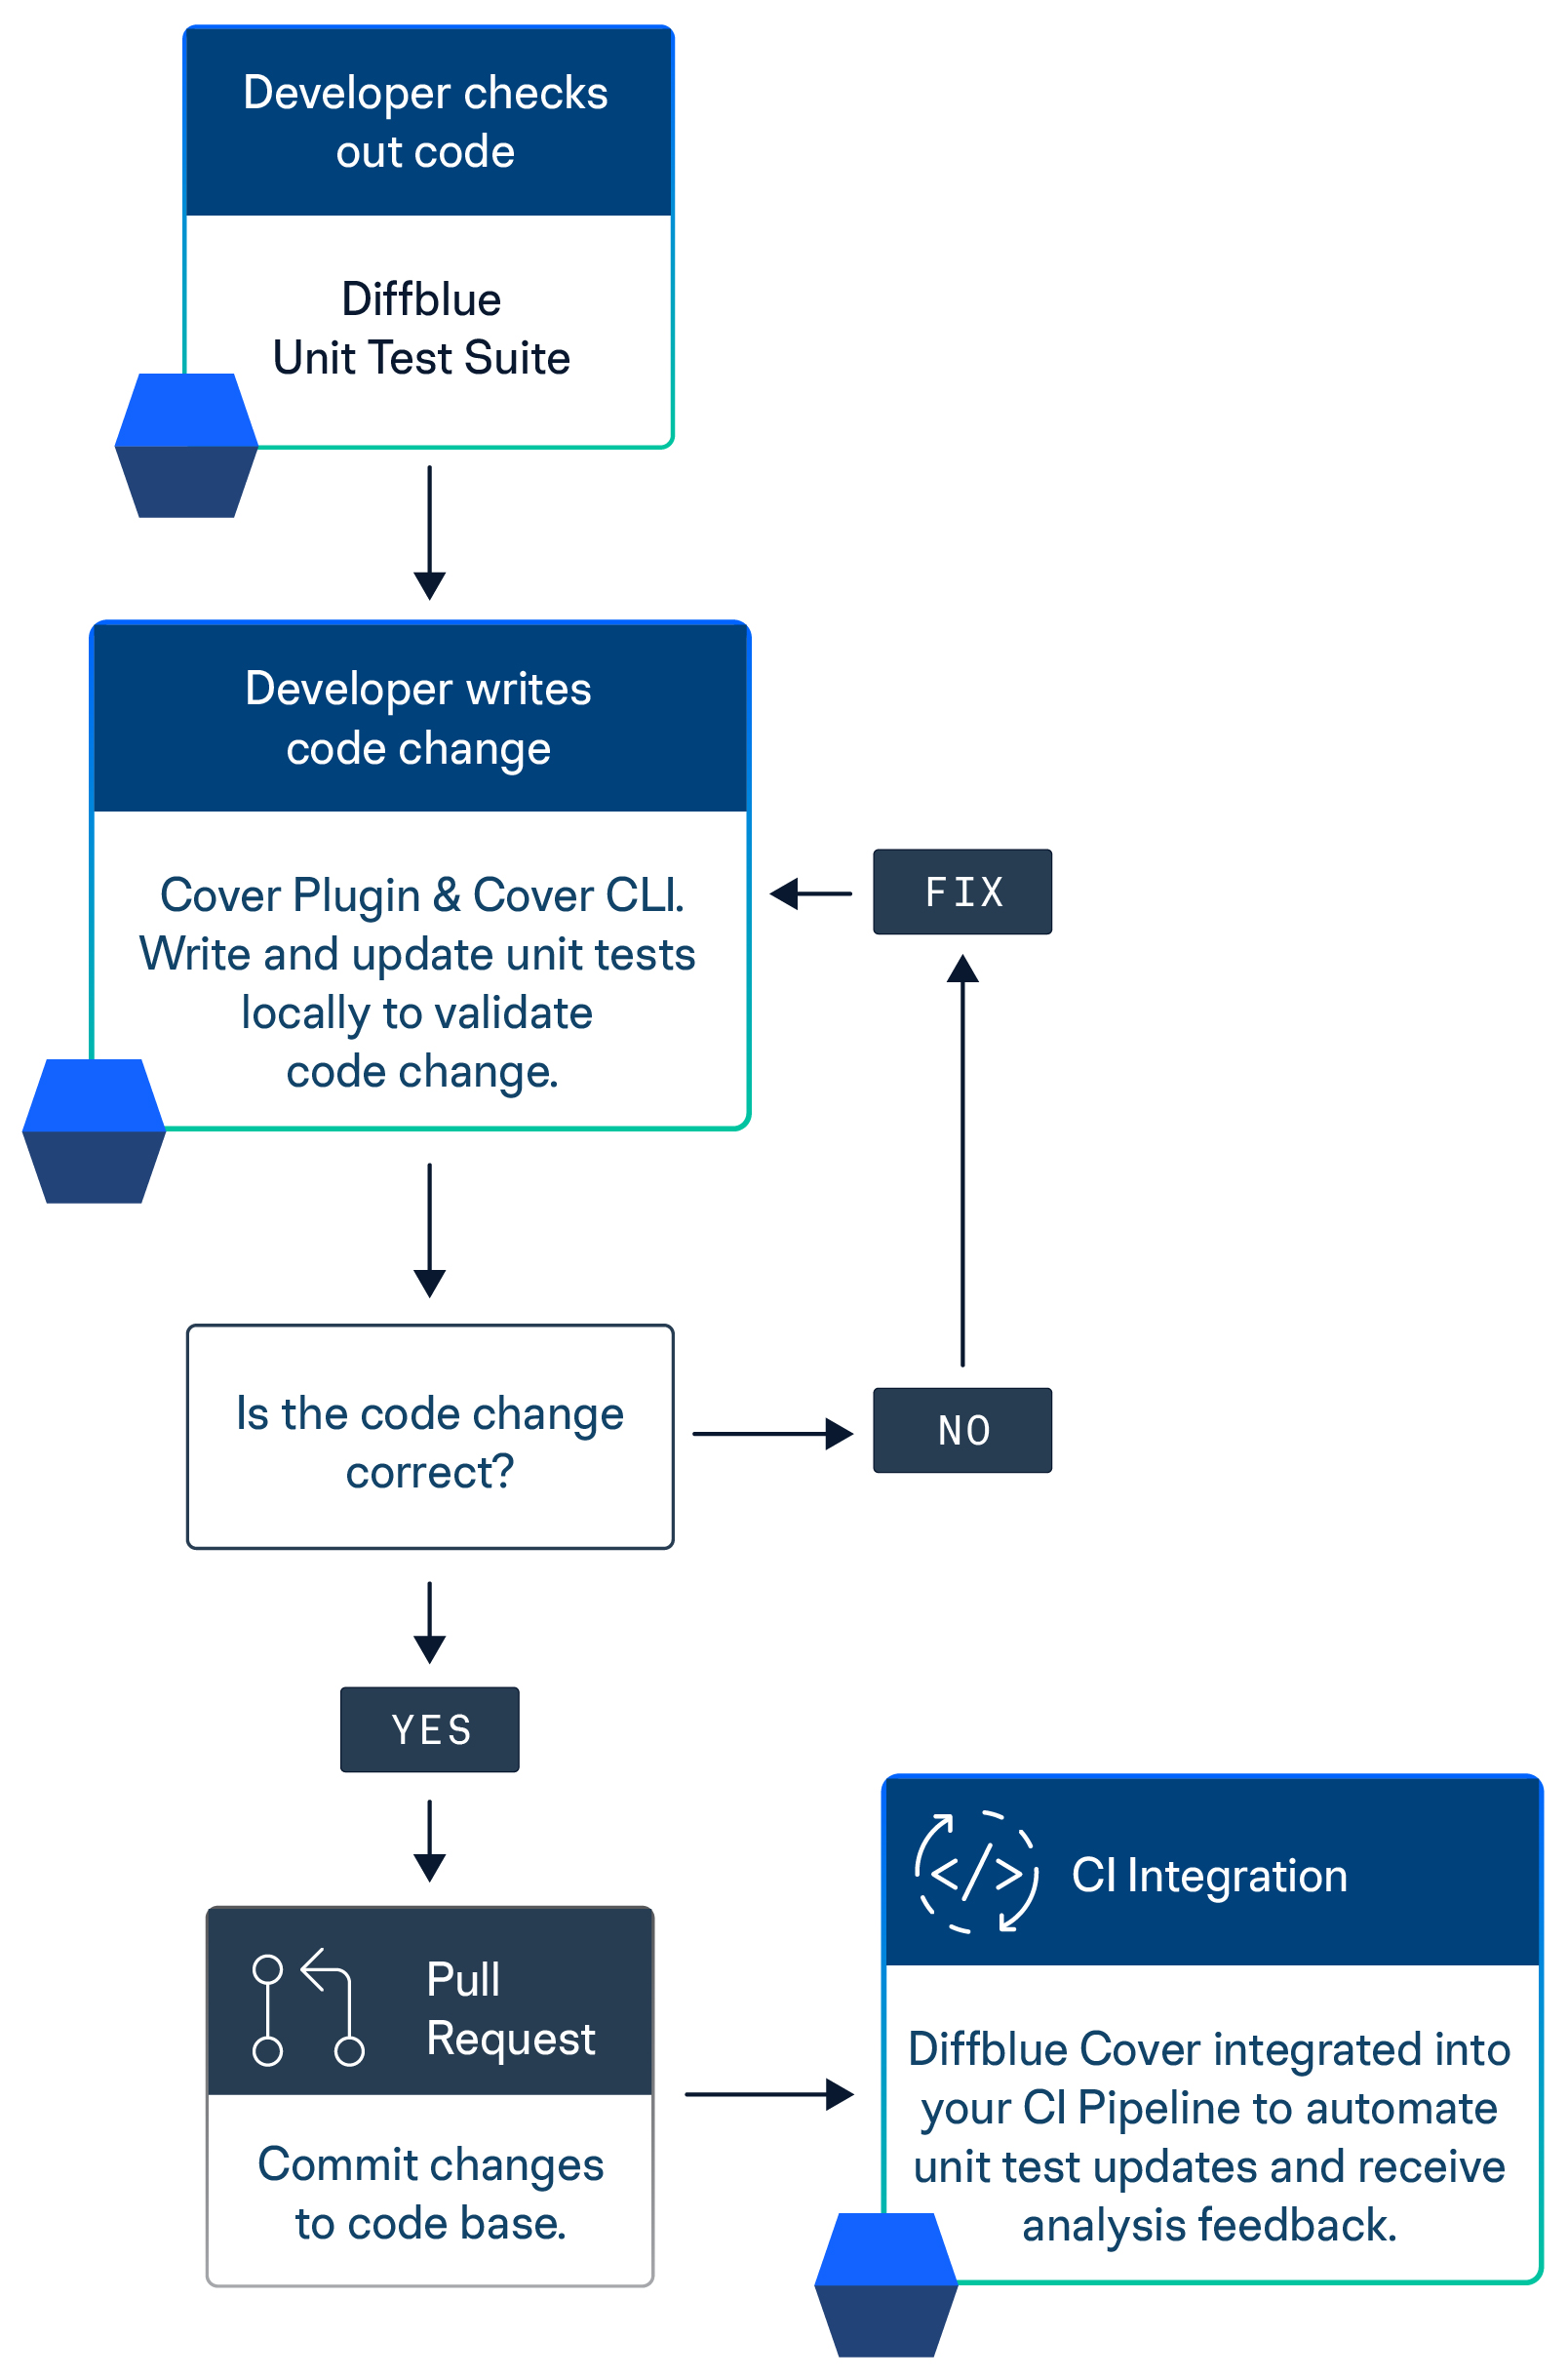
Diffblue Cover is also provided as an IDE plugin tool so you can write tests with one click in the IntelliJ IDE (see [get-started-cover-plugin](https://cover-docs.diffblue.com/get-started/get-started/get-started-cover-plugin "mention")) and as a developer CLI tool to write tests for your entire project, all in one hit (see [get-started-cover-cli](https://cover-docs.diffblue.com/get-started/get-started/get-started-cover-cli "mention")).
But Cover CLI, Cover Plugin, and Cover Pipeline are not mutually exclusive, in fact they make perfect partners. Use Cover Plugin within the IntelliJ IDE to write and check unit tests for your application during development, and also use Cover CLI directly from the IntelliJ Console or your OS command line to access the wider and deeper functionality provided by Cover CLI - finally, use Cover Pipeline within your CI tool to automate the whole process and provide consistency across your organization.
---
# Agent Instructions: Querying This Documentation
If you need additional information that is not directly available in this page, you can query the documentation dynamically by asking a question.
Perform an HTTP GET request on the current page URL with the `ask` query parameter:
```
GET https://cover-docs.diffblue.com/get-started/get-started/get-started-cover-pipeline.md?ask=
```
The question should be specific, self-contained, and written in natural language.
The response will contain a direct answer to the question and relevant excerpts and sources from the documentation.
Use this mechanism when the answer is not explicitly present in the current page, you need clarification or additional context, or you want to retrieve related documentation sections.